Removing the Inner Pane of Vista View Windows
http://www.airstreamcentral.com/articles/57/1/Removing-the-Inner-Pane-of-Vista-View-Windows/Page1.html
BH Powell
 Retired Federal waterfowl biologist (research). Enjoys plant taxonomy, aviation, Airstream rebuilding and Scouting.
 By BH Powell
Published on 08/13/2009
Double paned Vista View windows on vintage Airstreams often develop condensation or discoloration between the panes of glass. Here is one solution to rehab fogged Vista Views.
Vista view windows these days are single pane but that was not always the case. In my 1972 Overlander they are double paned and apparently this was intended to reduce heat coming in the trailer. The inside of the outer pane, which is curved, tempered glass had some type of applied low emissivity (low-e) film to reduce IR and UV radiation. Over years the film had broken down and is trapped between the panes.
| I understand that the inner panes were either glass or acrylic. Mine happened to be acrylic. Since Airstream no longer manufactures a double pane vista view window, if you want to replace your windows with a new one, you will get a single pane window and there is a chance that the rivet holes will not line up. Why not just remove the inner pane which will allow you to clean out the degraded film, then apply a new film to the exterior of the window. | 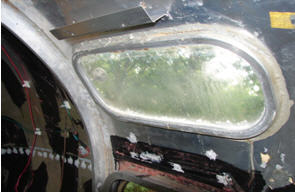 |
| The double pane vista view windows are a mess when that film breaks down. This article details how to remove an inner pane made of acrylic. As these pictures show I have the interior skins off but this method, with modification, should work with the skins on just as easily. Check out the before and after views to get an idea of the profound difference this project can make. Compare.... | 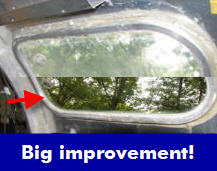 |
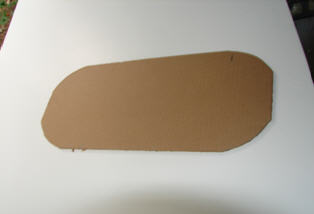
| Each pane of a double pane vista view window is set in its own track or groove. If you remove the inner pane and glazing strip, you will be left with an empty groove, which presents no problem. The outer pane will be complete unaffected by this process. Step 1: Make a cardboard template of the inside flange of the vista view window. |
 |
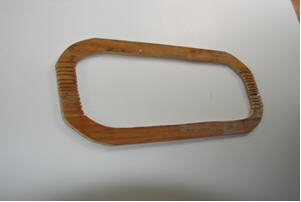
| Step 2: Transfer the outer dimension of the cardboard to a scrap piece of 1/2" thick plywood. And cut it out. Now flip the piece over and kerf cut the underside of the plywood with the kerfs about 1/4" apart and about 3/8" deep. This will allow the plywood to easily bend and form to the curve of the vista view window. Finally, mark a line approximately 1-1/4" inside the outer dimension line and cut that line. When finished, you should have a template that looks something like this: |
 |
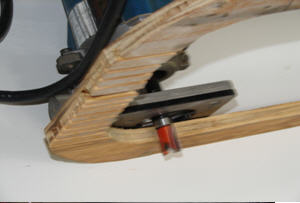
| Step 3: Use a trim router with a 1/2" straight bit and a guide bushing. The bushing should be at the top of the cutter flutes. The length of the bit is important. The guide bushing should run along the inside of the plywood with the bit barely cutting through the 1/8" acrylic inner pane. Extreme care should be taken not to let the bit get involved with the outer pane otherwise you'll be ordering a new window from Andy and they are not cheap. Here is a picture of the template and the trim router with the bit in place: |
 |
| Step 4: Get some double sided tape typically used to hold down carpet and go out to the trailer. Cut strips of tape and affix to the rim of the vista view window. Now remove the paper backing to expose the second adhesive side. | 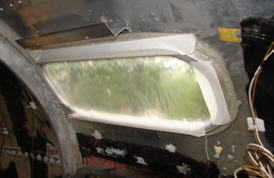 |
| Step 5: Stick the plywood template on the vista view window. The double sided tape will keep it from shifting laterally. To hold it down, use a few pieces of gorilla tape. | 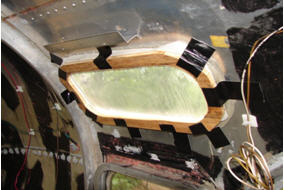 |
| Step 6: You are almost ready to cut the acrylic now. Double check the depth setting of the router. With the base plate of the router riding on the plywood, the guide bushing of the bit must run along the inside edge of the plywood and the tip of the bit should extend through the 1/8" thick acrylic but not enough to contact the outer pane of tempered glass. You can check this by holding the router in place with its tip touching the inner pane that you are going to cut. The space between the plywood template and the base plate of the router should be slightly more than the 1/8" thickness of the acrylic pane. |
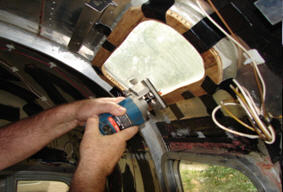 |
| Step 7: When you are satisfied with the setup, turn the router on and carefully plunge the bit through the acrylic. Withdraw the router and turn it off. Put back through the hole you have just cut and make sure it will not touch the outer pane. Look through from the outside to inspect this. When you are satisfied that everything is in order, withdraw the router, turn it on, set it back in place and carefully begin cutting the acrylic in a clockwise direction. Go slowly and carefully. When you have gone most of the way around the template, withdraw the router and turn it off. Examine your progress. It should look something like this: |
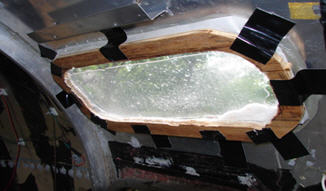 |
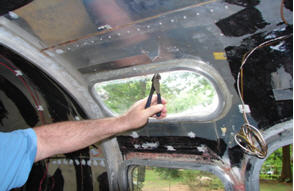
| Step 8: Now remove the tape, plywood template, and piece of acrylic. You will be left with a band of acrylic at the edge of the window and the rubber glazing that held the pane in the track. Grab a pair of diagonal cutters and cut the remaining acrylic as shown at several places around the window. Make sure you are still wearing your eye protection because the acrylic can shatter and send shards flying. |
 |
| Step 9: Pull out the pieces of acrylic and the rubber glazing. | 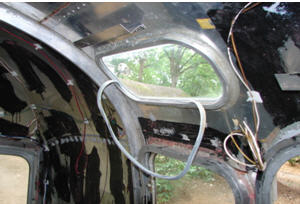 |
| Step 10: You're almost through. Take a single edge razor blade and scrape off the remaining film on the inside surface of the outer pane. Polish both sides, step back and congratulate yourself for saving over $200 to replace the vista view window, not to mention the time, tools, and aggravation. It takes less time to do than it did to write this article. | 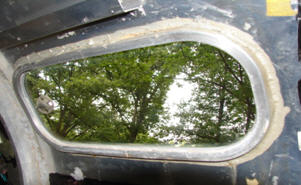 |